Directions for Applying and Affixing Labels
Overview
Click the links in the table of contents below to take you to that section of the page:
- Surface Type
- Storage and Shelf Life
- Minimum Application Temperature
- Service Temperature
- Surface Preparation
- Manually Affix the Label
- Remove Adhesive Residue
- Affix Labels to Fabric
- Cold Weather Application
- Machine Affixing
General Design: Security and Hologram Labels
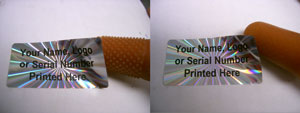
Security labels have a built-in release pattern to show evidence of tampering. When removed, the hidden release pattern will become visible — either words (such as OPENED, VOID, etc) or symbols (a dot pattern).
For conventional security and hologram labels, the hidden release pattern will also separate from the label material leaving an adhesive residue on the surface to which it was applied and leaving the same pattern in the label material.

Our non residue security labels (SecureGuard™, SecureGuard™ Plus, etc) are different; they will only leave the release pattern in the film and no (or little) adhesive residue on the surface.
Despite these differences, these directions for affixing apply to all security and hologram labels.
A) Surface Type
Adhesion is best on smooth, hard surfaces including most non-porous surfaces (glass, plastic, metal, painted surfaces, fiberglass, vinyl, PVC, etc) and many porous surfaces (paper, cardboard, bare wood, etc).
For some plastic surfaces (polyethylene, etc) and textured surfaces special adhesives may be needed. We suggest you order samples and test to assure suitability.
Security labels are not recommended for delicate fabrics, leather, fine furniture, etc, where cleaning up the adhesive residue may damage the finish. Also, some chemicals in the adhesive may stain or tarnish delicate surfaces.
Always test in an inconspicuous area to assure label adhesion and compatibility; also confirm that the adhesive residue cleans up as intended, without damaging the surface.
B) Storage and Shelf Life
Store at a maximum 90F temperature. Relative humidity at 35% to 90%. Shelf life is minimum 1 year. Cooler temperatures extend the shelf life.
C) Minimum Application Temperature
For our stock adhesive, the surface temperature must be a minimum +35F. Our outdoor grade adhesive (designated as 'AA' in the product code) can be applied in temperatures as low as +5F. For applying labels in colder temperatures, see the instructions in Section I below.
D) Service Temperature
After application, the labels with stock adhesive will remain affixed for temperatures ranging from -40F to +200F. The AA adhesive has a service range of -85F to +300F. These ranges are based on application to bare stainless steel. Temperature ranges may vary for other surfaces.
E) Surface Preparation
The surface must be clean and dry. Initially wipe the surface with a clean dry paper towel.
If adhesion is poor (or the label does not show tamper evidence when removed), it may be necessary to chemically clean the surface using 90% isopropyl alcohol and a clean paper towel. After cleaning, use another clean paper towel to dry the surface. Do not allow the alcohol to air dry as contaminates may remain on the surface.
Other acceptable brand name cleaning solvents are Goo Gone, Orange Sol, and 360 Multi Surface Cleaner. Lower grade (less than 90%) isopropyl alcohol is not as effective. Do not use rubbing alcohol; it contains oils which will interfere with adhesion.
For some plastic surfaces and textured surfaces, special adhesives may be needed. We suggest you order samples and test to assure suitability. Another option is to lightly abrade the surface with sandpaper to improve adhesion. Please call if you have problems with adequate adhesion to plastics.
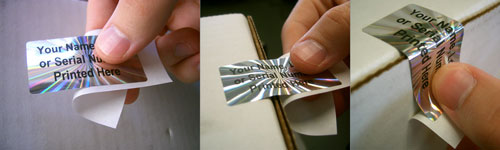
F) Manually Affix The Label:
Peel the label from the paper backing and apply to the surface. For most non-porous surfaces, the label will indicate tampering if removed immediately. For some plastic and textured surfaces, the adhesive may require up to 4 hours to achieve the proper bond to activate the tamper evident feature when removed.
Under certain conditions the tamper evident feature can be inadvertently activated when the label is in the process of being affixed. Here are tips to minimize "pre-triggering" of the tamper evident feature:
Minimize Contact
Minimize contact and pressure with the adhesive side of the label. Use light pressure to manually remove the label and transfer to your finger. Then, immediately apply the label to the intended surface. The tamper evident feature is more likely to activate if the adhesive side is handled with too much pressure, or the the label is positioned on your fingers for an extended time.
Use Skin Moisturizer
When handling the labels, apply a skin moisturizer to the tips of fingers which will come in contact with the adhesive side of the label. The added moisture will minimize the chance of activating the tamper evident feature during application.If the skin on your fingers are dry and chapped, it is more likely it will activate the tamper evident feature.
Use "Rubber Finger Tips"
Wear a rubber finger tip on the finger which is used to touch the adhesive side of the label. The rubber finger tips have a "nubby" side and a smooth side — the smooth side works better. If needed, turn the tip inside out to expose the smooth side. Rubber finger tips are available at most office supply stores (they are typically used to improve manual handling and sorting of paper).
Flag the Label
Peel back a portion of the liner (backer) to expose a portion of the adhesive side of the label. Affix the exposed portion of the adhesive to the intended surface, then peel away the balance of the liner to fully affix the label.
Label Orientation
When applying the label to a difficult surface, over a seam, gap or bend of a container, box, etc. it is important to have the optimal orientation to prevent the labels from flagging (see below - perpendicular to the seam).
We recommend selecting a label that will make sufficient contact with both sides of the seam or bend to prevent adhesive failure. Another option for difficult applications is to include perforations at the fold over point to improve adhesion. Click here to download our Installation Guide for Security Labels.

Do not use a metal or plastic instrument
Using a knife blade, tweezers or other hard, dry instrument to affix the label is NOT recommended. The hard and dry surface will cause the tamper evident release to activate.
G) Remove Adhesive Residue
For Non-Residue Labels, adhesive residue can be minimized by peeling the label slowly and at a very sharp angle (ideally 180 degrees).
After affixing conventional tamper evident labels (or tape), when the label is removed it will leave an adhesive residue on the affixed surface.
Before applying a new label, remove the adhesive residue by.....
1. BLOTTER TECHNIQUE: For some surfaces, the label itself can be used to remove the adhesive residue without using any solvent. Use the removed label as a "blotter" — press the adhesive side of the label onto the adhesive residue remaining on the surface. Repeat as needed to remove all the adhesive residue. If the blotting technique does not work, you will need to use a solvent to clean the residue.
2. CLEANING SOLVENTS: The recommended solvent is 90% Isopropyl Alcohol, which is available at most grocery and pharmacy stores. Other acceptable cleaning solvents are Goo Gone, Orange-So, and 360 Multi Surface Cleaner. Lower grade (less than 90%) isopropyl alcohol is not as effective. Do not use rubbing alcohol because it contains oils which will interfere with adhesion. The most aggressive solvent is acetone (finger nail polish remover), which is only recommended for bare metal, glass, or plastic.
3. CLEANING PROCEDURE: For all solvents, always test in an inconspicuous area first to assure the solvent will not damage the surface.
Use a clean, dry paper towel (or cotton pad) to apply the solvent. After removing all the adhesive residue, use the solvent one more time and then wipe the surface dry with another clean paper towel. Do not allow the solvent to air dry, which leaves contaminants on the surface — always wipe the surface dry.
Another option (though a little more expensive) are alcohol prep pads, which are typically 70% isopropyl alcohol (70% is not as effective as 90% isopropyl). The solvent and towel are contained in a single use packet. Just tear open the packet and wipe the adhesive with the disposable alcohol pad, then dry with another clean paper towel.
4. APPLY AND RUB LIGHTLY: Apply the solvent to clean cotton pad (or cloth). Rub lightly to remove the adhesive. Repeat as needed. The milder adhesives require repeat applications.
CAUTION: Adhesive solvents are flammable. Keep away from heat, open flame, sparks, or other ignition source. Also, some solvents have health risks. Follow the manufacturers guidelines for using the product.
Optional adhesive removal kits are available from NovaVision.
H. Affixing Security Labels to Fabric
When affixed to most fabrics, our stock labels usually will not tamper when removed. This procedure uses super glue, which will make the label tamper, but the remaining residue will result in a spot of hard, permanent adhesive remaining in the fabric.
Apply a small amount of super glue directly on the fabric, then apply a stock hologram label on the super glue. Allow 1 minute for the super glue to dry. As the super glue dries it creates a solid piece of glue which penetrates and bonds to porous fabric; it also bonds to the adhesive on the back of the hologram label.
Tip: If the fabric is porous, put some wax paper (or scotch tape) on the backside of the fabric, directly underneath the fabric where the hologram will be applied. This barrier material prevents the super glue from penetrating and bonding the material directly beneath the fabric. After the super glue has dried, remove the wax paper for reuse.
After curing, when the label is removed from the fabric, the label will tamper when removed. The super glue adhesive residue remaining on the fabric is a solid piece of glue which cannot be removed.
We offer the super glue in a 0.18 oz bottle, which should be enough for 200 labels. The super glue has a small brush to help place the glue quickly and accurately.
The super glue we tested and recommend is Loctite® Brush-On Super Glue (product number 75353 06965), which is commonly available at most hardware and department stores.
I) Cold Weather Application
The minimum application temperature for our stock adhesive is typically +35F; the outdoor AA adhesive is +5F (holograms with an 'AA' suffix in the product code have the outdoor grade adhesive).
For colder ambient temperatures follow these instructions:
- The surface must be clean and dry.
- Apply the label to the cold surface.
- Apply supplemental heat on top of the label for 30 seconds. Supplemental heat can be applied with a rubber hot water bottle (filled with hot water), a portable hand warmer, or a hand-held electric heat gun (maximum +175F). The supplemental heat is intended to increase the surface temperature to above the minimum application temperature for 30 seconds. This assures the adhesive can initially set. Be sure to confirm that the supplemental heat level you select will not damage the surface where the label is to be applied.
Supplemental heat can also be applied from under the label or around the label. The goal is to heat the surface (which is in direct contact with the adhesive) to a temperature that is above the minimum application temperature, and maintain this higher temperature for at least 30 seconds.
WARNING: Do not use an electric heat gun or any power tools in an area that contains flammable vapors. Sparks from the power tool can ignite vapors causing serious injury or death.
- After applying the supplemental heat for 30 seconds, the adhesive will have bonded sufficiently to the surface. The label is now capable of experiencing colder temperatures, as noted in the temperature service range.
J) Machine Affixing
For large quantity projects, many commercial printers will mechanically affix labels to another document. Some affixing machines require special design considerations for the labels:
- Some machines require printed black timing marks on the liner. Other machines can electronically sense the die cut label and do not require printed timing marks.
- Some machines require a polyester film liner, which provides added strength during the affixing process. Film liners are more expensive and often require custom tooling. Some machines can operate with our stock paper liners, which is less cost.
- Roll size is often larger — up to 16 inch OD. Affixed rolls are shipped with loose tension to avoid adhesive 'ooze'. Careful handling is required to avoid 'telescoping' the roll.
- Thicker labels are usually more compatible with affixing machines. Some machines may have issues with labels constructed of .001 inch thick film. Most of NovaVision's labels are .002 inches thick.
- AFFIXING INSTRUCTIONS:
- STORAGE: Store at temperatures less than 90F and relative humidity less than 60%. Higher temperatures and humidity can cause adhesive "ooze" and labels will stick to the back side of the liner (paper backing).
- HANDLING: Rolls are wound loose. Handle carefully to prevent "telescoping" or unraveling of the roll. Store partially used rolls on cardboard backer for added support.
- ROLL TENSION: Do NOT increase roll tension by rewinding or manually tightening the roll. Adding tension will cause adhesive "ooze" and labels will stick to the back side of the liner (paper backing). Excessive tension can also cause the label to buckle and not lay flat when affixed.
- USE SIDE SHIELDS: When the roll is placed on the affixing machine unwind, use side shields to keep the loose rolls from "telescoping" or unraveling.